
Cloudflare is a very popular CDN. But you need to add three Cloudflare page rules for WordPress to make sure your dashboard and editor are not cached.
Bloggers who use WordPress know that a fast and secure website is critical.
The first step is to use a reliable and fast web hosting provider or managed WordPress hosting.
But the second stage is to use a CDN (Content Delivery Network) to help make your site load faster for visitors all around the world.
How to reduce loading times for WordPress
- Use a caching plugin
- Minify CSS and Javascript
- Use lazy loading for images
- Use CDN services
You can find thousands of articles, reviews, and opinions online about the choices for these four key speed elements.
So I won’t go into any depth here in this article about these ideas.
I will focus mainly on how to get WordPress to run smoothly and fast with your Cloudflare account.
However, before I go on to setting up Cloudflare page rules for WordPress, I should preface my advice by indicating what speed tools I am currently using on my site.
- For caching, I use W3 Total Cache for browser and page caching.
- For CSS and Javascript minification, Autoptimize has proven to be very reliable for me for years now.
- For lazy loading, I use the Autoptimze setting. You can stop lazy loading on the first few images to help with better web vitals results.
Both are free versions available from the WordPress plugin repository and work superbly well together.
It is possible to minify with W3 Total Cache, and it works perfectly.
But I find that Autoptimize is a little better because I don’t have to make any setting adjustments when I add or delete plugins.
While these plugins alone reduce page loading times exceptionally well and often result in near 100% results on some speed test sites, there remains a problem of distance.
My site server is in Switzerland, and it is very fast and reliable, especially for site visitors from Europe. But for, say, my US visitors, there is a long distance for the site data to travel.
This results in slightly slower page loading times, affecting user experience in the US, Canada, South Africa, and Australia.
Using a CDN service solves the distance problem

Cloudflare is well known as a reliable CDN (Content Delivery Network) provider that is used by bloggers and enterprise clients.
Cloudflare support is good, and 95% of your questions can be answered from the official Cloudflare knowledge base.
In brief, once you change your IP addresses, Cloudflare works by storing your static files on local servers.
Your data can then be delivered much faster from the Cloudflare cache to site visitors in any location because more than 80% of your web pages usually consist of static data.
However, it does not store static HTML by default, but this is no big deal.
There are many choices for CDN providers, but Cloudflare offers three huge advantages.
- One: The network is worldwide.
- Two: It can protect against hackers.
- Three: It is free.
This makes Cloudflare the logical first choice for bloggers wanting to use a free plan CDN with no rate limit to improve their site performance.
Setting up a WordPress site on Cloudflare is a straightforward process, and many in-depth articles explain the process.
Here is one article example explaining the basic Cloudflare setup steps.
You will transfer your DNS records and servers from your web host to Cloudflare servers.
The only tip I would add is that the WordPress Cloudflare plugin is not really necessary.
But if you want to use it, you will need to use your Cloudflare Global API key to connect the plugin from your WordPress dashboard.
It is just as easy to start your installation from the Cloudflare website and then complete the setup steps and add web applications from the Cloudflare desktop page and admin area. But the choice is up to you.
Now you have a very fast site for all your worldwide visitors
After installing and activating Cloudflare, your site is now much more secure with DDOS protection, flexible SSL, and faster loading.
When you check your site and run a few speed tests with Google PageSpeed, GTmetrix, or Pingdom, you will see how fast your site is after deploying Cloudflare.

Everything is working; your site is lightning fast, and you are pleased, so all is great with the world.
But my WordPress admin page and editor are slow!
When you deploy Cloudflare, wp-admin, or your desktop admin page might suffer a few issues.
The most common issue is slow loading. Or, on rare occasions, 500, 504, or 524 errors, and perhaps you might even get a white screen.
You could also suffer from incomplete loading of your WordPress editor, and sometimes you could have javascript errors.
After a few days, the problems usually tend to get worse.
I nearly tore my hair out, trying to resolve these annoying issues. Normally it is only a matter of searching on Google to find a WordPress fix, but this one eluded me for a while.
In the end, the solution came from two pieces of information that I glued together after my frustrating hunt through probably hundreds of advice articles.
The problem is with the default Cloudflare WordPress cache settings. Your admin pages are using different and conflicting cache settings.
But don’t worry because the solution is quite easy. You only need to set up some simple Cloudflare page rules for cache handling, and WordPress will be like new again.
Cloudflare needs a couple of special setup tweaks to work nicely with WordPress.
How to get Cloudflare to work correctly with Wordpress admin pages
There are two simple steps involved in solving your WordPress slow admin page problems on Cloudflare.
First, and most importantly, you have to change one automatic cache expiration setting in Cloudflare.
This is where all the admin page problems start because you need to use your WordPress cache settings and not the default Cloudflare settings.
The default settings are for a couple of hours of caching, which is why the admin pages lag so badly.
You definitely want to cache your site’s front end for your visitors, but you don’t want to cache any of your back-end admin pages.
You can fix this very quickly by changing one cache setting in Cloudflare.
How to change the cache setting
Login to your Cloudflare account. Then on the Cloudflare dashboard, click on the menu item, Caching.

Now, change the Browser Cache Expiration setting to Respect Existing Headers from the drop-down selection box.

Your cache is now working correctly. The cache for your backend admin pages is now controlled by WordPress, not Cloudflare.
Add your Cloudflare WordPress page rules
Next, you need to fine-tune your admin page performance.
Here are the three Cloudflare page rules you need for WordPress.
Go to the Page Rules app to set up your page rules.

You will need to add three rules. As you only get three rules with a free Cloudflare account, it is important to use them wisely to optimize Cloudflare for WordPress.
Add your first rule for your wp-admin page. You can copy the rule below but edit it to your own site URL.
The stars at the beginning and end are wild cards and are necessary to make sure all your associated pages use the rules.
*example.com/wp-admin*

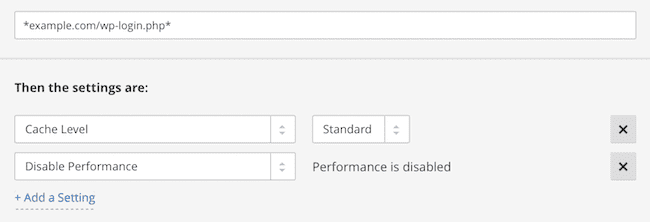
Then add two basic settings. Cache Level and Disable Performance.
Important! You have to change the cache setting from Standard to Bypass on all three rules.
There are other settings for Edge cache TTL and Browser cache TTL, but you don’t need to use these settings.
The second rule you have to add is to stop any interference with your editor and draft preview function.
*example.com/*preview=true*

Lastly, you want to make sure Cloudflare doesn’t affect your login page.
*example.com/wp-login.php*
Now you need to set the order of your rules as in the image below to make sure they load in the correct order.

To set the order, pull up or down using the arrows on the left of the rule box.
That’s all you need to do.
Extra Cloudflare WordPress page rules rule settings
You should add two more settings to all three of your page rules to improve performance.
If you are using Cloudflare’s Rocket Loader or any other Cloudflare app, it is a good idea to stop them from working on your WordPress backend. You can do this by adding Disable Apps.
The Security level is optional, but I prefer to set it at High.
These are the settings I use for my page rules.

You should do one last check to make sure that all your rules have the same settings.
Your Cloudflare WordPress page rules overview should look like this.

Now you will have all your backend WordPress admin pages behaving perfectly again.
The only other note I would make is that Cloudflare Rocket Loader can be a bit touchy. If it works for your site, that’s fine. But it can cause javascript errors.
Since WordPress 5.5, I noticed some issues, so I no longer use Rocket Loader on any of my sites.
Conclusion
Using a CDN is well worth considering for any WordPress site.
Not only for extra site security and to reduce page loading times but also to ensure that your site visitors have a positive experience when they visit your site.
Google has made it clear that it prefers fast loading websites and has made page speed a ranking factor. So this is another very important reason to think about upgrading your site with a CDN.
Maintaining your blog is always work in progress.
Keep looking for small improvements you can make to your blog to increase your visitor satisfaction and return rate.
Related Reading: Cloudflare Cache Everything Improves WordPress TTFB By 90%


Very helpful. I found however my site wasn’t caching properly (I test it using the “WP Cloudflare Super Page Cache” plugin) unless I had a page rule which was defined as follows:
*.example.com/*
Browser Cache TTL: 1 Day
Cache Level: Cache Everything
Edge Cache TTL: 12 Hours
Now obviously we only have 3 rules in the free Cloudflare accounts so what I did (to save a page rule) was to create:
*.example.com/wp-*
Cache Level: Bypass
Disable Performance
And that seems to cover wp-admin and wp-login. I then have the preview rule set up as you have in the article.
Hope this helps someone else out!
Is it possible to skip changing the browser cache setting you describe and still improve the admin side? My site is very image heavy and I’ve finally got Cloudflare to a setting where it takes a lot of the burden off my server (which is always complaining anyway).
You should only use one browser cache, Tim. If you have a cache plugin installed on your site, using the Cloudflare browser cache as well will cause problems. But if you don’t have a caching plugin installed, you can use Cloudflare.
It works!
Happy to hear it helped.
Thanks a lot
i used your method to fix new post editor buttons disappeared problem
Thanks for the great post !
In the cachin tab, what should we put in the caching level mode ? Standard, Ignore Query String, No Query String ?
In page rules, when we choose Cache level : Everything, We face problems with refreshing and displaying last post added. Which kind of page rules can prevent this problem ?
Thanks you for your precious Post !
Regards
I use the cache setting “Standard” and all works fine. Don’t use “Everything” in page rules for admin pages.