Update: Feedburner will close down on July 1st, 2021. This article has been updated to provide you with possible free Feedburner alternatives.
The content of the original article remains below so that you can compare the features and options of Feedburner alternatives.
There are many choices available to replace Feedburner. However, most of them are not free.
But there are two free options you can try.
2 Free options to replace Feedburner
There are only two services I could find that offer a genuinely free email notification service similar to Feedburner.
Follow.it offers a free plan that should suit most bloggers.
There is no limitation on the number of subscribers or how many email notifications you can deliver.
Of course, premium options are available that will give you more options. But the free service should do everything you need.
There is also a useful how-to guide to help you switch from Feedburner to Follow.it.
The only other viable option is Mailchimp.
There is an in-depth guide on how to share your blog posts with Mailchimp.
However, with Mailchimp, there is a limit of 2,000 subscribers on the free plan.
For most bloggers, this should be enough. But if you have more, unfortunately, you will need to pay.
Feedburner has been a great service for a very long time. It is very disappointing that Google has decided to close it down. But at least you have these two options to help you.
Original article below
What does Feedburner do?
If you are a new blogger or author, you probably know that a mailing list should be one of your promotion tools.
But email marketing is time-consuming.
Writing weekly or monthly newsletters is a chore. On top of that, using a premium service to deliver your emails can become expensive.
A much easier way to get started on building your list of subscribers is to use your blog feed.
You can get Google to do all the hard work for you.
All you need to do is blog regularly, which you probably do already.
Google Feedburner has been around for a long time. It is a tool that uses custom RSS feeds to notify subscribers when you publish a new post or article on your blog or site.
The beauty of the service is that you don’t have to do anything once you have set it up. The other bonus is that it is free.
Once it is up and running, all you need to do is add a page or widget to your blog so people can subscribe to your blog’s web feed.
You can then start to build your list of members and collect their email addresses.
It is a simple but effective way to start a mailing list.
You can see how it works by scrolling down to the footer of our site and clicking the subscribe button on the left.
How to set up Feedburner
All you need is a Google account, and who hasn’t got one?
Then go to the set-up page to add your blog feed address to Feedburner.
The first step is to complete the details of your feed management.
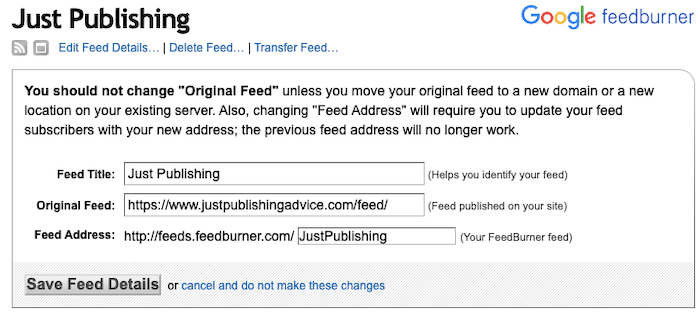
All you need to add here is the name of your feed in the first box.
You can use any description.
But your subscribers will see this when they receive your emails. It is best to use your blog name or your name so it is clear.
Then in the box marked original feed, add your blog address in full and add feed/ at the end as in the image above.
In the last box, you need to name your feed. Again, add your blog name or name, but note that you cannot use spaces.
Then click save feed details.
Optimize your feed
There are a few options to improve the look and performance of your emails. Go to the Optimize tab.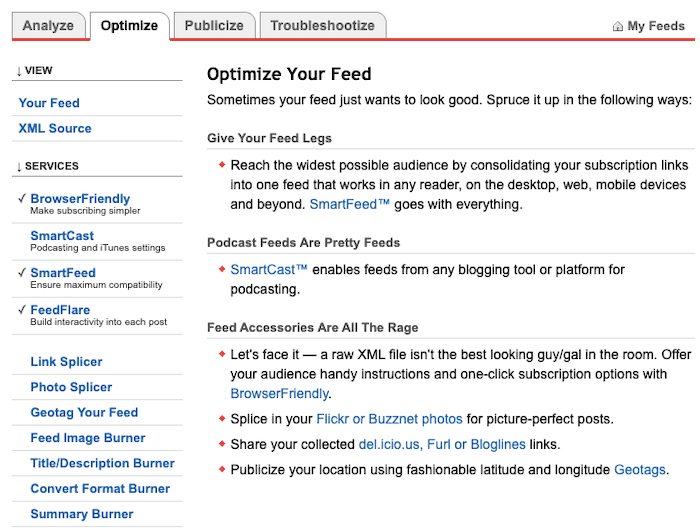
You only need to select and activate, BrowserFriendly, SmartFeed, and FeedFlare.
In the FeedFlare tab, you can choose and add share tools like Facebook and email.
Setting up your subscription page
The most crucial step is to add your subscription invitation page to your blog.
To do this, you will need to add a small piece of HTML code to your site. First, click on Email Subscriptions.
It will open the form code section.
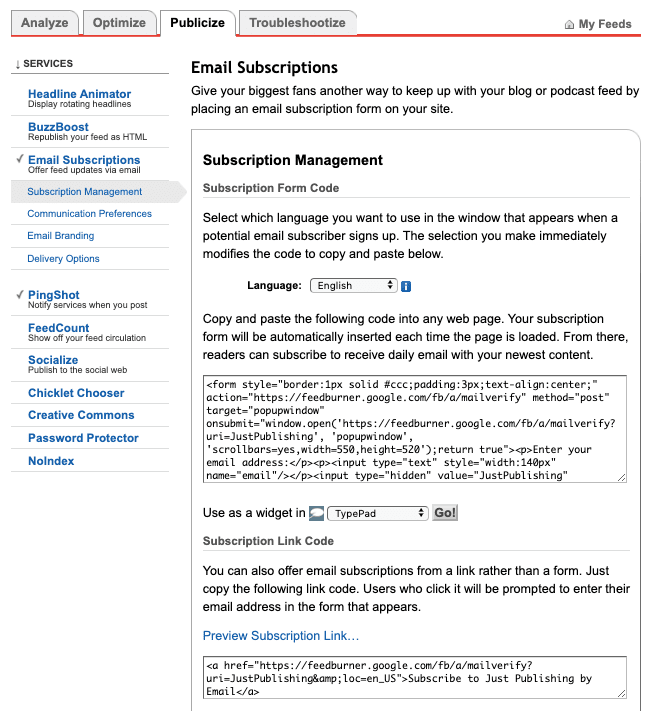
Now copy the code and paste it into a new page on your blog.
Make sure you use your page text editor and not the visual editor.
It’s usually best to use Subscribe as your page title. You can add extra text or images above or below the code to improve the look and appeal of the page.
Publish your new page, and then add a link to the page in your main menu or footer.
If you prefer, you can also use the same code in a blog widget on your sidebar.
The last box in the image above is what people will see when they agree to subscribe. Click the preview link to view it. You can change the text if you like.
Now you are all set.
How does Feedburner work?
Once you complete the setup, the first thing to do is become a subscriber to your blog.
It is the easiest way to make sure everything is working and to check that the subscribe page on your blog works as expected.
The next time you publish a new blog post, you will receive an email from Feedburner with your new post within 24 hours.
If you notice anything you would like to improve, you can always go back to the options on Feedburner and make your changes.
One last check you need to do is for your subscribers. It is a little hidden, so here is how you can find your list.
First, go to the Analyse tab and click Subscribers. Scroll down until you see Feedburner Email Subscriptions.
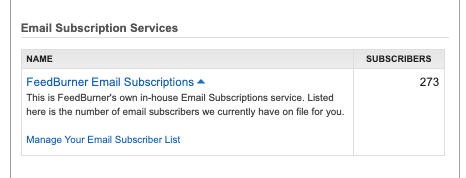
Click to open the Manage Your Email Subscriber List.
Click on this link, and you will see your list of subscribers and mail addresses. If you ever need to, you can export your list in a CSV file.
Summary
Building a mailing list is always worthwhile.
Using Feedburner is a quick and easy way to get started and help you connect with more readers.
It is not fancy, and it performs the basic task of delivering emails and managing your subscribers.
But if you don’t want the hassle of email marketing, it is the perfect solution.
Then you can concentrate your energy on writing new blog posts.
However, in the future, you might want to upgrade to a premium tool like Mailchimp or Aweber to be able to use targeted mailing lists for newsletters or auto-responders.
If so, at least you have the possibility of importing your list of Feedburner subscribers.
Related Reading: How To Build Your Author Platform With Your Blog And An Email List
Share This Article

Hi Derek!
Thank you for posting this very useful
information..