
Before you self-publish a book or an ebook, you always need to create a table of contents (TOC).
It’s often the last task you need to do after you finish writing your manuscript.
However, when you try to add one, it can sometimes lead to a bit of confusion or frustration if you are not sure about how to do it.
To help make the process a little easier for you, let’s look at how to add a TOC correctly.
Table of contents guide
A table of contents in a book requires the correct formatting before it can be inserted into the contents page.
When you learn to apply heading styles correctly, creating and inserting an updatable table of contents (TOC) is very easy.
Most errors occur due to inconsistent heading formatting, so I’ll cover this in detail for you.
In this guide, we will look at how to add a TOC in four ways.
1. Microsoft Word
2. Apple Pages
3. Make A clickable TOC
4. In an ebook
I’ll take it step by step to make it easier.
However, if you prefer, we have a short video showing you how to add a table of contents.
Heading styles for chapter titles
Creating a table of contents to show what your book includes depends entirely on the heading styles you use for your chapter titles throughout your book.
It is an automatic table, so you need to check all the heading text in your document before you start.
To do this, go to the Home Tab in Word, then the Styles Toolbox from the View menu.
In Apple Pages, under the Text menu, click the arrow next to the Default tab.
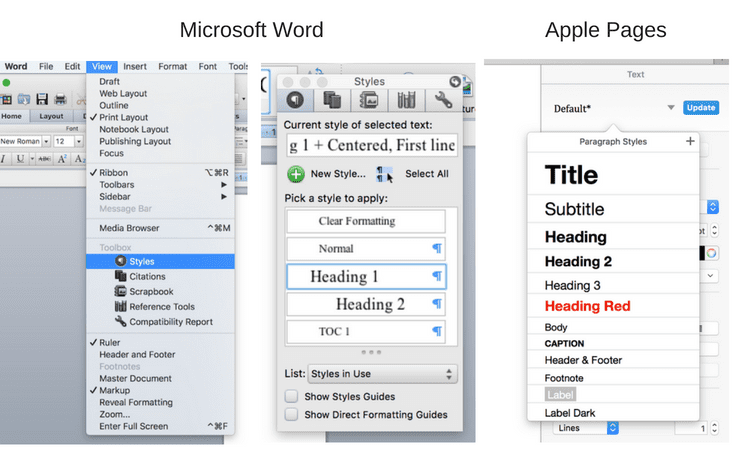
Consistent headings are the most important step before creating references, a table of contents, or footnote insertions. So, make sure every heading is correct.
You need to check all your heading text. In most cases, you will choose Heading 1 style for your book title and Heading 2 style for your chapter titles.
On rare occasions, you might want to have subheadings in a chapter.
If you want to use this heading level, select Heading 3 style.
Make sure you don’t use any headings in your copyright notices. You don’t want these appearing in your TOC.
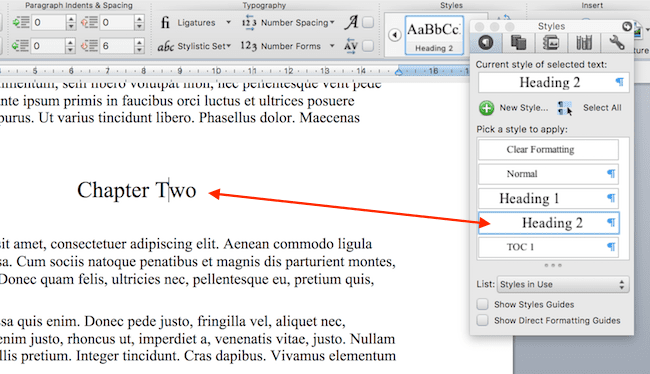
Go through your Word document, select the text for each chapter heading, and select heading 2. Use heading 1 only for your book title on the title page.
You might also want to insert page numbers in the footer if you haven’t done so already.
However, when you are formatting an ebook, you should not use page numbers.
Once all the headings in your document are set correctly, you are ready to create a TOC page.
1. How to insert a TOC field in Word
Go to the point in your document where you want to insert your TOC and place your cursor at the insertion point. This is usually your contents page.
Then, go to the Insert menu.
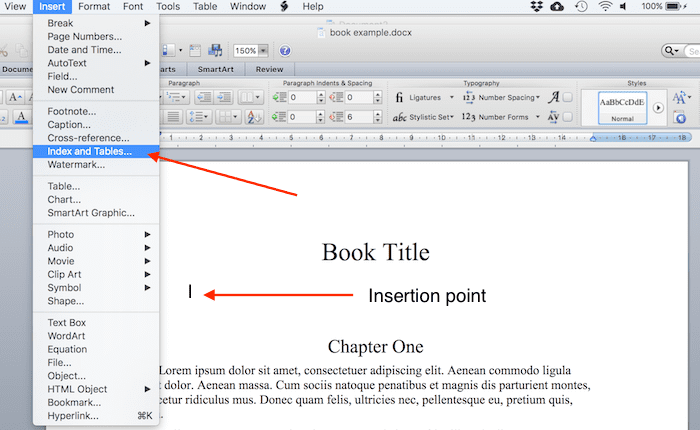
Click Insert Index and Tables. You will see the following dialog box.
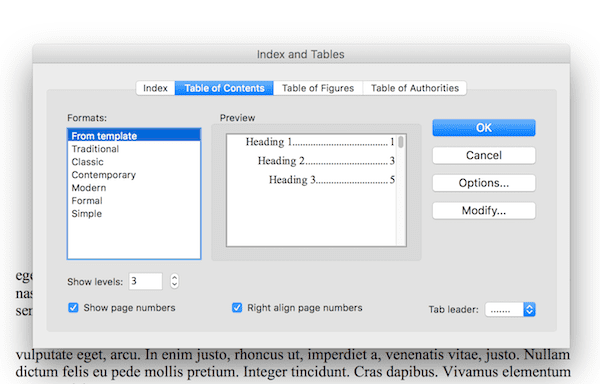
You can select your TOC style from the Formats box. Next, click Options.
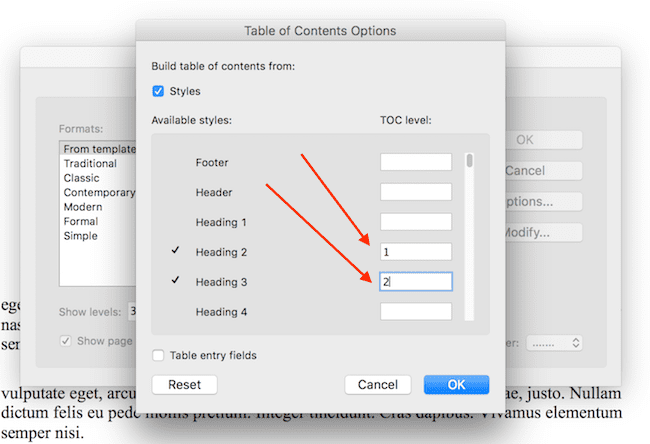
This is the most important setting.
Make sure that you number the priority of your headings.
Delete any other numbers in the Available Styles list and only retain the heading styles you use for your chapter headings. Then click OK.
Now, click the modify button.
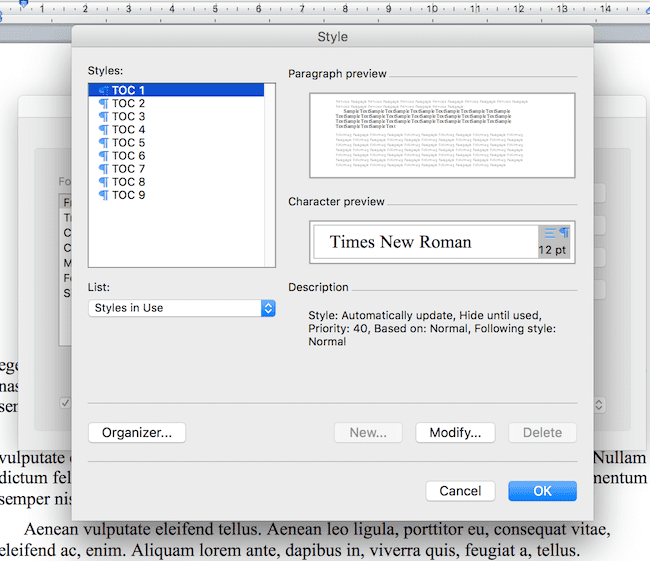
In this box, you can change the look and feel of your TOC heading style. If you want to make font and style changes, click the Modify button.
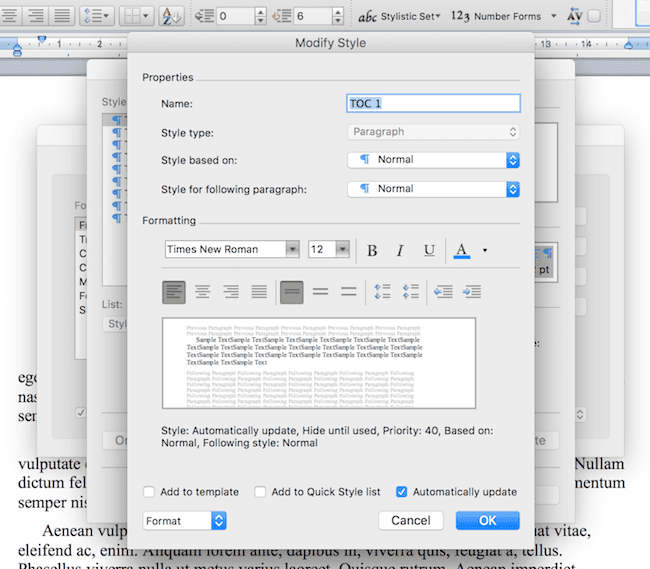
Click OK when you have finished styling your text. Then click OK again.
Your custom table of contents is now in your document.
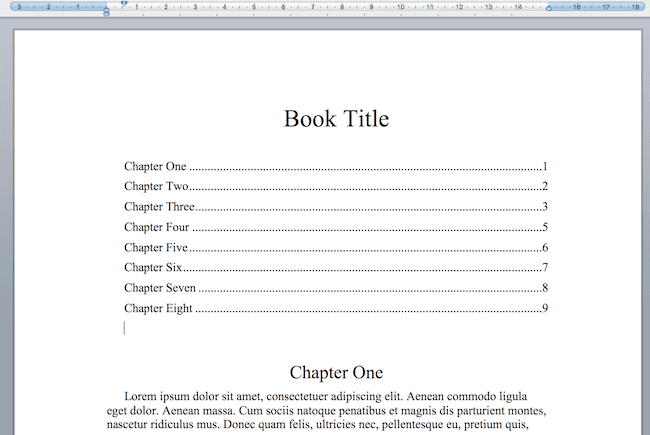
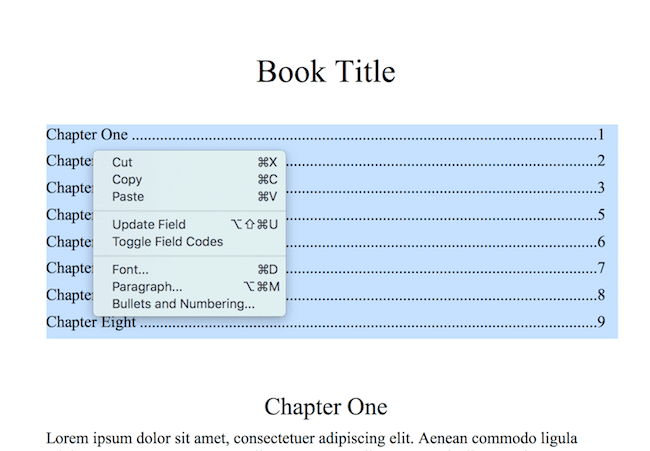
If you want to make changes to your TOC styling, select all the text in your TOC and right-click. You can then select from the menu to change the font or paragraph styles.
In the same pop-up menu in the image below, you can update the table of contents dialog box by clicking Update fields.
If you make any changes to your document, this will automatically update the page number or text changes you have made to your chapter headings.
Whenever you make changes to your document, right-click on the TOC. Then, update the table of contents by choosing the update field.
The Toggle Field Codes option is not very useful, as it only shows the code behind your TOC.
The process above is similar for most versions of MS Word, including Word 2007, Word 2010, and Word for Mac.
2. Add a table of contents in Apple Pages
It is a similar process to Word but with a couple of minor differences.
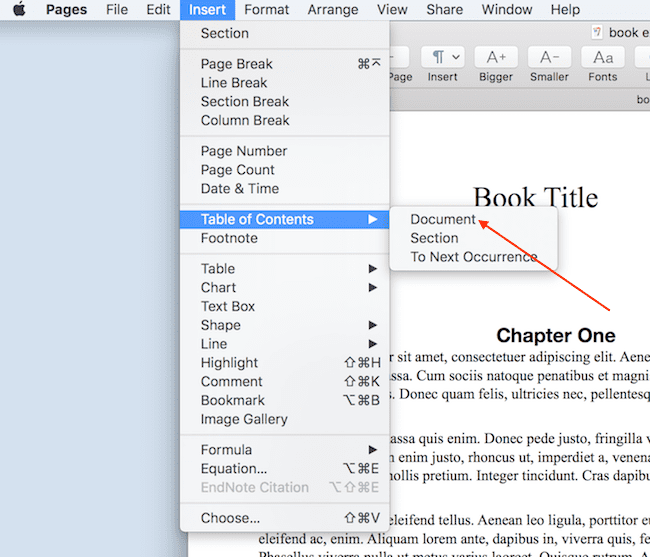
First, choose Insert Table of Contents and then Document at your insertion point.
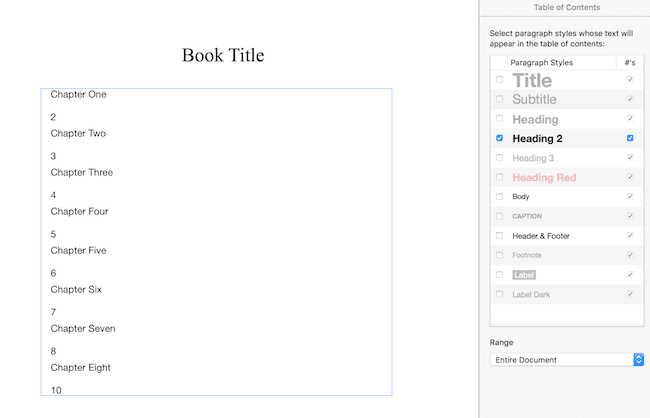
Next, select only the headings that you use for your chapter titles. Again, this is usually Heading 2.
To style your TOC, click on the table of contents field. This will change the menu tab on the right.
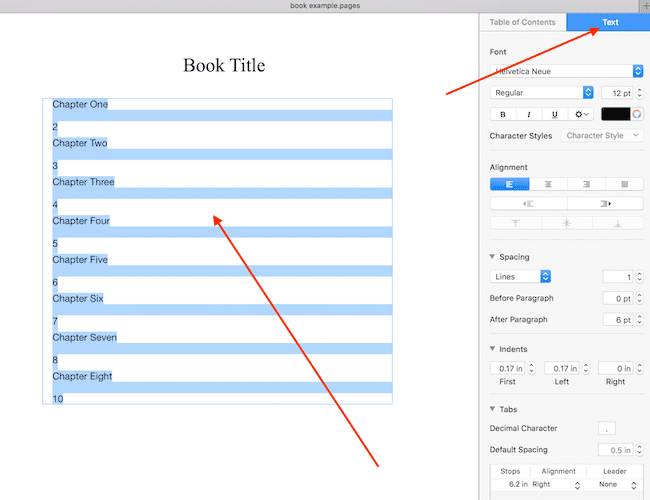
Now, you can style your text and fonts. But there is one last setting to ensure your page number is in the correct location next to your chapter titles.
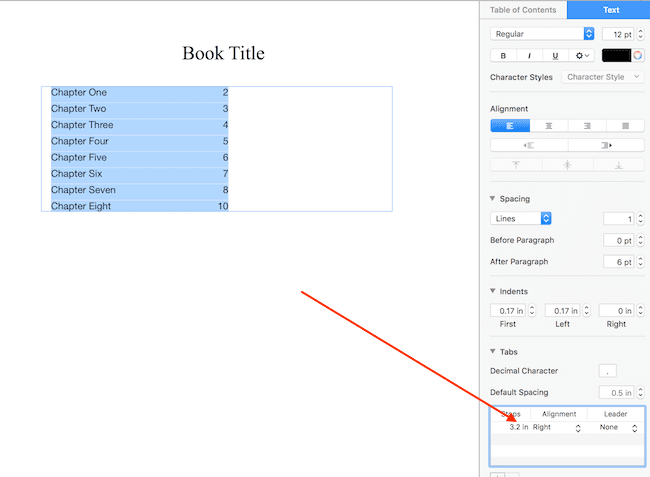
At the bottom, you can adjust the tab stops, alignment, and add a leader if you wish.
To make any alterations or changes, click on the TOC, and the same dialog box will appear.
There are some uses for having a fully navigational or clickable TOC.
Perhaps you want to create an online document or a PDF. But it’s not a necessity by any means. But here’s how you can do it.
It is a manual process, so your TOC will not be automatically generated. But again, make sure your chapter heading style is consistent and uses heading 2.
The first step is to manually type a list of all your chapters where you want your TOC.
Then, you can start building your TOC by adding a bookmark to your chapter headings.
Select your chapter title text, and then from the Insert menu, Bookmark.
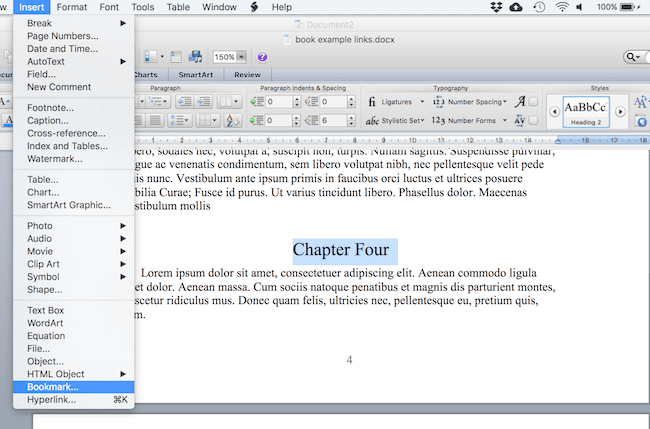
The next step is to name your bookmark. You cannot have spaces in the name. It can only be letters, so choose something recognizable for each of your chapters.
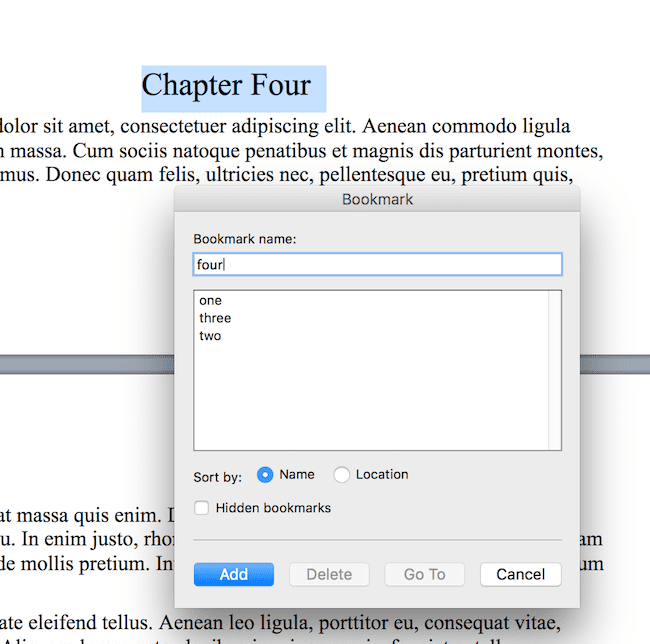
Click Add, and you have set your bookmark. Now you need to add your chapter title to your navigation list manually. As you can see, I have already added the first three chapters, but now I’ll add a link to chapter four.
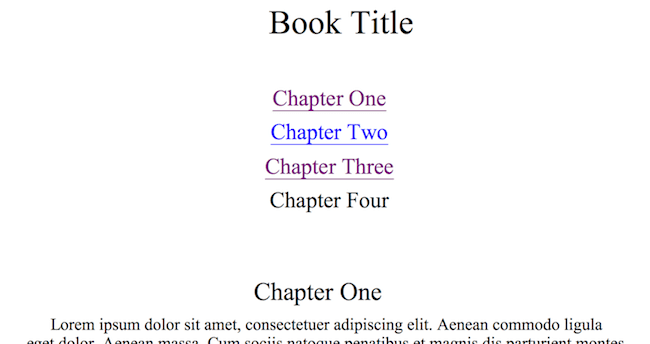
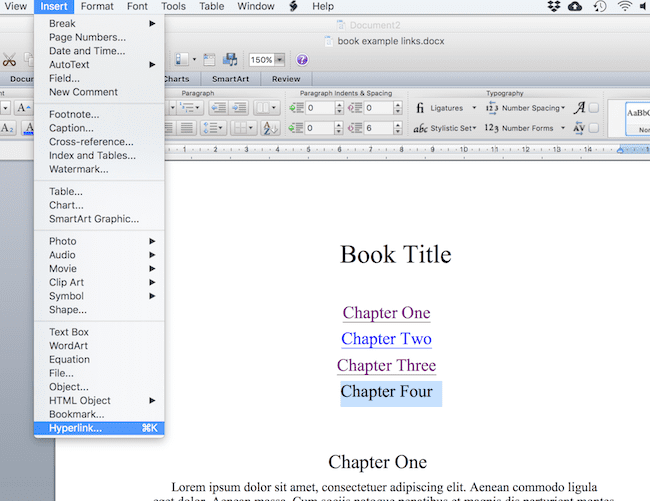
Now, select the text and choose Hyperlink from the Insert menu.
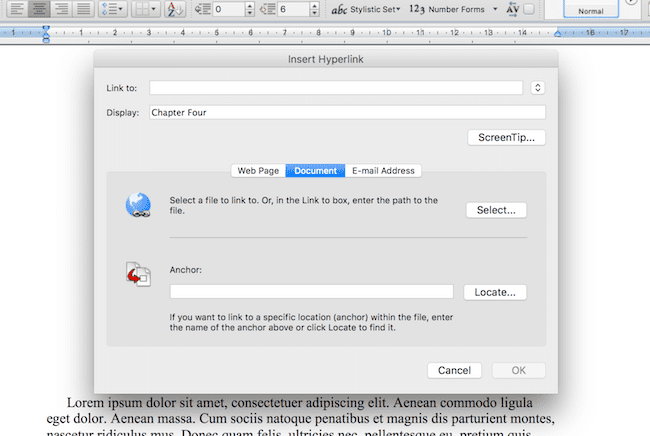
In the next dialog box, select Document and then click Locate.
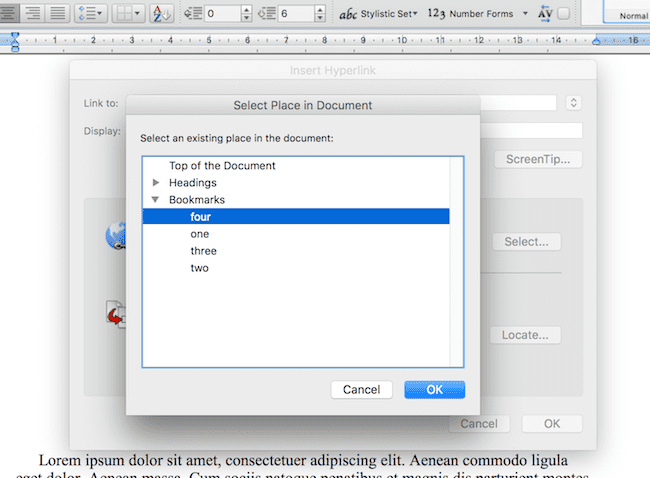
In the next dialog box, open the Bookmarks menu if necessary and then select your chapter bookmark. Then click OK.
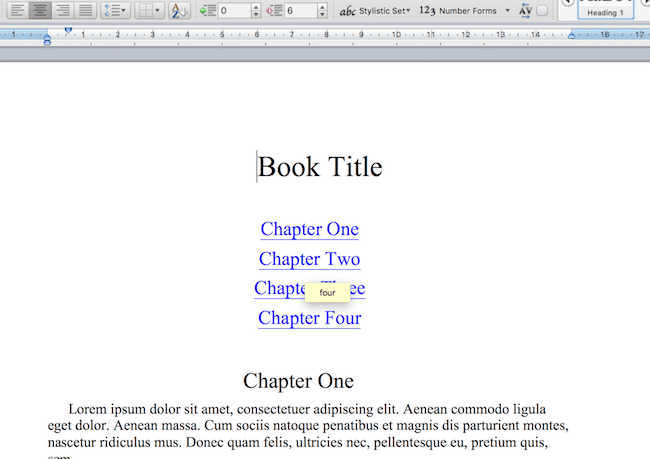
You now have a hyperlink to chapter four. You can see the alt text box when you hover your cursor over the link. Clicking the link will take you to Chapter Four.
4. Adding a table of contents to an ebook
Good news. You do not need to create a table of contents in an ebook if you use the right software or upload it directly to Amazon KDP or an aggregator.
The only action you need to take is to ensure that ONLY your chapter headings are using heading 2. You should check your document carefully to make sure there are no other instances of heading 2.
If you use Draft2Digital (D2D) to publish your ebooks, you only have to supply a Word docx file with no copyright or title page. D2D will complete all the front matter, including your title page and table of contents for your ebook.
It is almost the same if you are using Kindle Direct Publishing (KDP). However, before you upload, you need to create a title page and copyright page in your docx file.
If you want to create your own ebook files in mobi and epub, you can use Calibre to make the conversion.
Read this article for instructions: How To Convert A Document From Word To Epub Or Mobi.
An automatic table of contents is created for you when you convert to epub or mobi using Calibre.
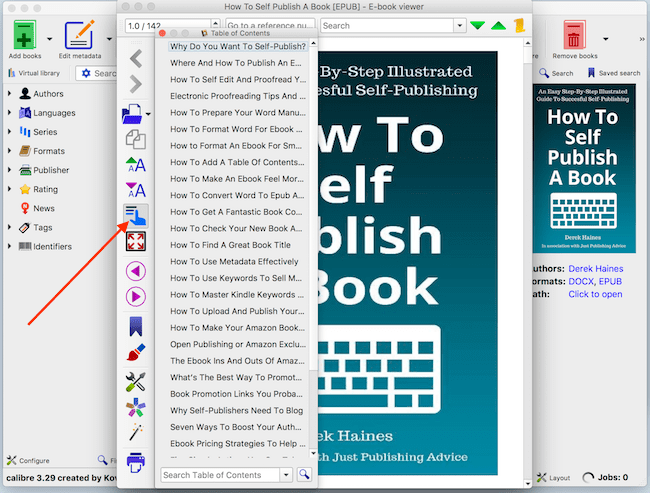
Now go to your book on Calibre and click on the book or the file type to open it.
Click on the TOC icon, marked with the red arrow. Then, you will see all your chapters listed.
They will be used as ebook navigation points on a Kindle device or any other ebook reading app.
Summary
While there are many different ways to create a table of contents, the most critical factor is formatting your chapter headings using styles.
Heading 2 must be used to make sure that all entries in the table are correct.
Since all TOCs are automatic, if your styles are mixed or not reserved for chapter headings only, your TOC will be inaccurate.
Once you have mastered the basics, adding a table of contents to any book is a quick and easy process.
Related Reading: How To Add An Index To An Ebook In Alphabetical Order
Share This Article


Thank you!