
Who wants to wait for ages for a page to load? Especially on mobile. A good Google speed test score is vital for your site.
Page speed and Core Web Vitals are crucial today, and there is no reason to have slow page or website load times, especially with WordPress sites.
If your average load time for your site is more than three to five seconds using a website speed test, you are losing traffic. Your bounce rate will be high because readers will not wait and watch a white screen.
Website performance is a vital SEO factor, and it will help you improve your search engine ranking and conversion rate. In fact, Google now has a Core Web Vitals mobile-first priority for ranking keywords and pages.
How to make sure your blog is up to speed
Many factors affect the test results of a speed test.
Internet services that provide speed tests vary from country to country or even city to city.
If you have tested your Internet connection, you will know that download and upload speed depends on your service provider and the efficiency of checking your internet and wi-fi connection.
However, with the Google Speed Test using Pagespeed Insights, you can get a general overview of your download speed and the site’s performance for your site visitors.
There is no need to think that getting 100 is always the main aim. You can waste a lot of time chasing perfection in web performance. But getting green scores is relatively easy and will mean that your site is performing well.
Just Publishing Advice has a lot of inbuilt functionality, widgets, and images but still manages to score very well for site speed. Here is a quick look at its site performance.


The mobile score is usually a little lower because Google reduces the result if you do not use images in next-gen formats.
At present, this would be a very big task for any blog, as it requires replacing every image on your site with JPEG 2000, JPEG XR, or WebP image files. For most bloggers, you can ignore this warning and continue to use JPEG and PNG image files.
How to test your site speed performance
Google’s speed test gives you a good approximate measure of your site speed.
You can also check your average page loading time in Google Analytics.
But it doesn’t give you the information you need to analyze your site performance in detail.
You need better SEO tools to do the job.
If your Lab Data is all green, you are fine.
But if your ratings are orange or red, you need to take some action.

Depending on how much traffic you get, you may or may not see your Core Web Vitals assessment.
This measures real user speed data from the Chrome browser.
It’s a pass or fail test if you have enough traffic to generate the report.

These reports give you guidance as to where you can improve your site’s performance.
But Google page speed test tools don’t give you much help to trace and fix problems.
Let’s look at alternatives
Finding how to fix problems
A much better way to check site speed is to use GTMetrix.
It is open source and uses the Google Pagespeed score and Yahoo’s YSlow, and it gives you far more information than Google.
When you are performance monitoring and measuring your speed, there are two timings you need to check.
While most testing services use Fully Loaded Time to measure site performance, it is not the most important statistic.
The most accurate real-world measure of site speed is the Document Object Model (DOM) loaded time.
It is the point in the site loading process when a web page is active for a user.
For me, this is the most important statistic when measuring the true speed of a web page.
You can see in the image below that while the Fully Loaded time is 1.9 seconds, the DOM Loaded time is only 1.3 seconds.

Here is another view below. The red line marked by the arrow is the DOM loaded point.
You can see that elements that are not needed in the first user view are loaded later.
The elements loading later are usually images that are being lazy loaded and javascript files that are deferred until needed to help your page perform better.

Whenever you check your site, always pay close attention to your DOM loaded time because it is a much more accurate measure of how fast your site is for a user.
Also, run a test two or three times because Internet speeds vary from minute to minute.
You can get a better idea by averaging your results over, say, an hour or so or even longer.
All Internet speed tests have this natural variation, so don’t worry about getting one random bad result.
You can check with other speed test sites as well.
If your site is not scoring green ratings from Google and GTMetrix, here are eleven simple, quick and easy ways you can fix the problem and keep your site visitors and search engines happy.
The first thing you should do is check your sidebar. Do you need all those widgets and ads? In fact, do you really need a sidebar at all?
You should think of your pages as prime real estate.
How much valuable area is wasted on your site by elements that serve very little real purpose and slow down your site?
A cluttered web page is also difficult to read because there are too many distractions.
Most sidebar elements increase loading speed, so the more you can remove, the better.
2. Avoid on-page content dependent on external sites
One of the worst offenders for slowing down a web page and failing the Google speed test is a Facebook Like button.
Your page has to wait for Facebook before your page loads. It is a common problem with most social media widgets and sharing buttons.
Some can add up to two seconds or more to your page load time.
If you need social media sharing, look for a lightweight plugin.
Other Internet services that can slow elements on your site include Amazon ads and widgets and large banner Google ads.
If you have Google Adsense, try to use in-article ads instead of big banner ads and set your ad balance to around 70-80 percent.
Contrary to what you might read about Adsense, there is not a great load on a site if you use in-article ads.
Here is a page on our site with Google Ads measured by GTmetrix.
The effect on load time is minimal.
With two ads, the fully loaded time is perfect at just over two seconds, and the DOM loads in 1.6 seconds.
Also, the ads are loading late, which means that the page is not waiting on Google before the page renders.

3. Check for slow javascript files
Every element you have on your site takes time to load.
Filling your site with lots of plugins, widgets, and add-ons has a huge speed cost.
Here is a GTMetrix assessment of a website that really needs urgent attention. A page loading in 12.4 seconds is abysmal today.

You can use GTMetrix to locate every element slowing down your site.
Click the + sign next to every GET to find out what is slowing down your site and what you need to fix, remove or optimize.
A site such as the one above can be improved quickly by taking three very easy measures.
The following three points will explain adding a cache, minifying and aggregating CSS and Javascript, and lazy loading images.
All three plugins recommended below are free.
4. Install W3 Total Cache
There are many very good caching plugins for WordPress, including WP Super Cache and WP Fastest Cache.
But I have used W3 Total Cache for over ten years now on all my sites.
There are a lot of settings you can use with all of these plugins to leverage browser caching, but there are only two that you need to set and use.
Here are the settings for Total Cache. But they are similar for all caching plugins.
You only need to activate the browser and page cache.


These two settings will speed up your site by caching elements of your site that do not change, such as your headers, footers, sidebar elements, and menus.
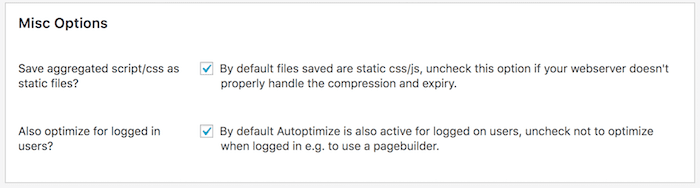
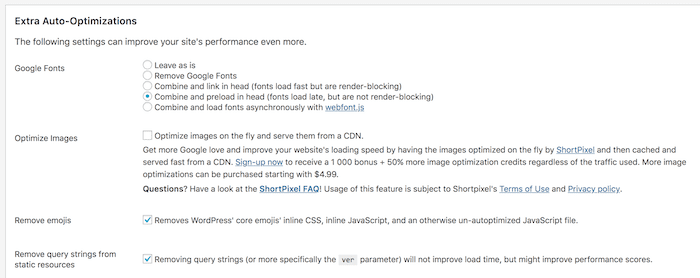
5. Install Autoptimize
Most caching plugins can also minify and aggregate Javascript and CSS.
While they all work quite well, some can be very complicated to set up.
I use Autoptimize to do this job because it is quicker, easier to set up, and much more efficient. In fact, you can set it up in less than a minute.
What it does is reduce the size of all CSS and Javascript files and then aggregates them into one CSS file and one Javascript file.
These two files then load so that they are not render-blocking, which is often a problem with a Google speed test for some sites.
Minifying and aggregating make a huge difference to your site speed.
Here are the settings I use for all my sites.


Another extra bonus with Autoptimize is that the support is fantastic.
6. Install a3 Lazy Load
When a user visits your website, all the images you have on a web page need to load before your page becomes active and usable for your visitor.
By using lazy loading, all the images that are not appearing on the user’s screen are only loaded as they scroll.
Doing this makes a huge difference to your site speed because your images will load after the DOM fully loaded time.
I tried a few different plugins before deciding on a3 Lazy Load. It wins on performance and ease of use.
Once installed, you can use the default settings, or you can make a few tweaks.
The plugin will lazy load all your images, videos, and iFrames.

7. Install WP Rocket
If you want an all-in-one option to replace the three free options above, WP Rocket can do everything and more.

Instead of having to use and set up three plugins, you can use WP Rocket to set your page and browser cache, minimize your Javascript and CSS as well as lazyload your images.
It can also optimize your database, and it offers integration with Cloudflare.
WP Rocket is an economical all-in-one solution to make your site lightning fast in minutes with very little effort.
8. Resize your images
Large images do not slow down site speed. But images that are not sized to suit a web page can slow your site speed dramatically.
You should always resize your images to exactly the size you need before uploading them.
If you want a full-width image, it should be sized to the width of your blog page.
This site is 750px wide with a 300px sidebar. Any image that is wider than 750px is going to slow down the site.
But never adjust the size of your images on the fly in your media details box. It will not reduce your page size.

As you can see, this image is 1218px wide. Selecting the Large size will make the image fit.
But in reality, the page will load the full-sized image of 1218px and slow down site speed.
Never use the Image Details box in WordPress to lazily resize your images.
Always resize images before uploading, so the full size is the actual size of your image on your page.
9. Optimize images
Smush is a popular plugin for reducing images by using lossy compression. I use the free version, and it works perfectly.
However, I take one extra step before uploading an image to any of my sites. I use a small desktop app called ImageOptim.
As you can see, it lossy reduces images by around 80%.
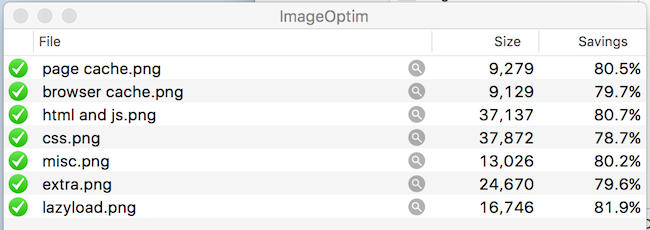
Unfortunately, it is only available for Mac users. If you are a Windows user, you can use any online image optimizer for the same result.
You can also read an earlier article on how to reduce images.
10. Use Cloudflare CDN
Do you need to use a Content Delivery Network (CDN)?
It depends. A CDN stores your static files on servers around the world to help your site load a little faster. If your site visitors are at a distance from you, it can help.
But if your site is getting mostly local traffic, it will not help a lot.
Just Publishing Advice is hosted in Europe, but a large percentage of traffic is from the US. So it makes sense to use a CDN.
If your site is hosted in Australia, for example, and you get a lot of traffic from the UK and US, you would probably want to consider using a CDN.
Cloudflare is popular, efficient, and free. So it is a good choice.
However, you do need a little technical ability to deploy it on your site.
You can read more about setting up Cloudflare with WordPress in our how-to guide article.
11. Check once a week
Once you have improved your site with the measures above, you should do a regular check.
Things always change on a blog, so it pays to keep an eye on your performance.
You will use Pagespeed Insights and GTMetrix most of the time.
However, there is one more free website speed test that you can do to check your site’s performance in 25 locations around the world.
Dot-Com Tools tests your site speed in real-time so you can see how your site rates.
It is a very good test tool and a guide if you are considering whether a CDN is worthwhile for you.

When you test, keep in mind that Google recommends a maximum fully loaded page speed of 3 seconds.
With WordPress, this is quite easy to achieve if you use the optimization suggestions in this article.
Summary
Do you need to do everything listed in this guide?
WordPress out of the box usually performs quite well as far as speed is concerned.
But if you use a slow theme and add a lot of plugins and use large images, then yes, you should consider doing some work if your site rates badly for loading speed.
Another cause can be an unreliable or slow host server. If you need to change your provider, a fast host costs only a few dollars a month.
If you are scoring in the red on the Google speed test, then you definitely need to do some work urgently.
One tip is to activate a default WordPress theme like Twenty Seventeen and test again. Most themes are now responsive, but some older themes can cause slow site speed.

If your theme is okay, the top priorities for improving a site like the one in the image above would be:
1. Install a caching plugin.
2. Install Autoptimize
3. Install a lazy loader
Take these three steps, and your site performance will improve instantly.
For your images, installing Smush and then doing a bulk optimization will help a lot too.
There is no reason to have a slow WordPress site and fail the Google speed test.
If you deploy the ten steps listed in this article, your site will pass the Pagespeed Insight test for mobile and desktop with ease.
Related reading: Cloudflare Cache Everything Improves WordPress TTFB By 90%


One thing that you might want to recommend is that these days you use double the “declared” resolution of your images. Using stated resolution results in very blurry, unsatisfying images (especially noticeable on screenshots) for people with high DPI retina displays.
You are wasting people’s time by telling them to try to pass this test.
Telling people to pass this test is like telling writers that the way to be a better writer is to follow all the rules of a grammar-checking app. The similarity is that both this test and the app can be useful but they are not smart enough to be able to tell you which of their rules can be broken.
What you should be doing is telling people to use GTMetrix. That test inclues PageSXPeed Insights as a component, but its main focus is on two stats that actually matter: page size and load time.
You’ll notice in the article that I do recommend GTMetrix, Nate.